Food Presentation Guide
Food Presentation Guide
Read on to discover plating techniques, how to plate food, an instructional plating video, and the tools you need to create your own signature food presentation style.
Shop All Plating ToolsHow to Plate Food like a Chef
While there are no fixed food presentation rules, there are several important concepts to keep in mind as you plate your meals.
- Remember your plate is your canvas.
- Arrange food items using the rule of thirds.
- Entice the eyes with visual stimulants.
- Use sauce as paint for your plate.
- Garnish to enhance both appearance and flavor.
Plating Techniques
Conceptualize plating as an art form: you are the artist; the plate is your canvas, and the food is your medium. Master the following plating techniques to perfect your craft.
1. Plate Presentation Techniques
Selecting the right plate for your meal is the first step in the food presentation process. Consider the following to choose the ideal plate for your food presentation:
- Plate Size - Your plate should be big enough to make your food stand out and petite enough to prevent your portions from looking small.
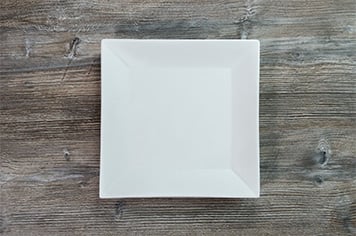
- Light vs Dark Plates - Use light and dark plates to make your meal stand out. White plates are popular because they offer a neutral background for brightly colored foods. Dark plates lend beautifully to light-colored dishes, such as a whitefish or creamy polenta.
- Plate Color - Plate color can stimulate or reduce appetites. Red increases the appetite, so serving appetizers on red plates keeps customers interested in ordering large entrees and desserts. Conversely, professional platers typically consider blue dinnerware unappetizing because there are few naturally occurring blue foods.
- Restaurant Style - If you operate a fine dining establishment, classic china dinnerware will pair well with traditional plating styles. A trendy gastropub should invest in unique plates with unconventional shapes that allow for maximum plating creativity.
2. Food Arrangement Techniques
How you arrange your food determines your meal’s aesthetic tone, structural integrity, and flavor dispersion. Here are a few of the most important food arrangement techniques:
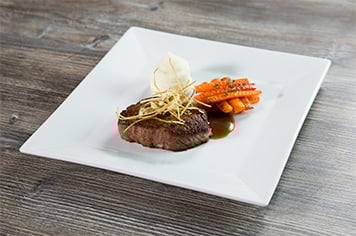
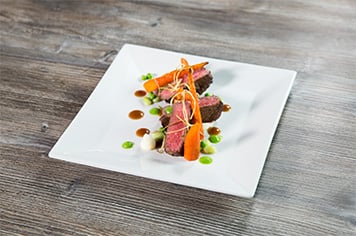
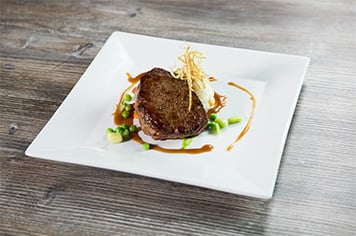
- The Rule of Thirds - When applied to cooking, the rule of thirds prescribes placing the focal point of your dish to either the left or right side of the plate, rather than the center. Use white space by thinking of the rim as your frame and highlight your plate’s focal point(s).
- View Your Plate as a Clock - As you plate your ingredients, picture the face of a clock. From the diner’s point of view, your protein should be between 3 and 9, your starch or carbohydrate from 9 to 12, and your vegetable from 12 to 3.
- Don’t Overcrowd Your Plate - Keep your design simple by focusing on one ingredient (usually the protein). Having a focal point helps you arrange your accompanying items to complement your standout item.
- Moist Ingredients First - Plate moist ingredients first and prevent them from running by placing other foods on top. For example, you can angle sliced meat against mashed vegetables.
- Create Flavor Bites - Flavor bites are forkfuls of food that combine all the ingredients in your dish into one bite. Flavor bites are essential to quality plating as they please both the eyes and the taste buds.
- Mix Textures - Contrasting a smooth vegetable puree with crunchy onion straws or topping a steak with crumbled blue cheese yields appealing texture combinations that are classic in high-end cuisine.
3. Visual Plating Techniques
Maximizing the visual elements of your meal is a key plating technique. While your arrangement develops around your protein, manipulating the colors and sizes of the other elements on your plate enhances your focal point and creates a gourmet presentation.
- Serve Odd Quantities: If you’re serving small foods like shrimp, scallops, or bite-sized appetizers, always give guests odd quantities. For example, serving seven Brussels sprouts instead of six enhances visual appeal, and diners will feel they’re getting more food.
- Color Diversity - Colorful dishes build the expectation of a flavorfully complex meal before your patrons take their first bite. Add green vegetables or brightly colored fruits that contrast with your focal point.
- Monochromatic Meals - Plating color-coded items together visually builds the expectation that the dish only offers one flavor. When the palate receives multiple textures and flavors instead, it surprises the tastebuds, causing them to engage with the dish more.
- Add Height to Your Plate - Visually stimulate your guests by building height. While compactly stacking ingredients isn’t as popular as it was 5-10 years ago, building layers of food for guests to explore offers an exciting experience.
- Create Visual Balance - Balance your plate’s landscape by leaning long, flat items against taller elements (ex: leaning asparagus spears at a 45-degree angle across a stack of lamb lollipops).
4. Sauce Plating Techniques

With your principal ingredients plated, you’re ready to top your dish with delicious sauces that enhance your food presentation. Think of your squeeze bottle or spoon as a paintbrush, and your sauce as a medium. Once you're done adding your sauce, make sure you wipe down the edge of your plate with a towel so no drippings distract from your presentation. We explain some of the simplest, most fail-proof sauce plating techniques below.
- Smeared Sauce - Fill a squeeze bottle with your sauce. Squeeze a thick layer of sauce in a large, filled-in circle on your plate. Take a spoon or plating wedge and dip it into the middle of the sauce where it’s thickest. Quickly pull the sauce across your plate.
- Accent Dots - Fill a squeeze bottle with your desired sauce. Analyze your plate from the perspective of the rule of thirds, then add accent dots. Use multiple sauces to create more color contrast.
- Smeared Accent Dots - Alternate between two sauce accent dots in a curved line along the side of your plate. Then, take a small plating wedge and place it at the center of the first accent dot in your row. Drag the plating wedge through the accent dots, creating a multicolored, single-sided edge.
- Swirled Sauce - Fill a squeeze bottle with your desired sauce. Place your plate atop a cake turntable. Point your squeeze bottle face down at the center of the plate. Spin your stand while simultaneously squeezing your bottle. Adjust your wrist to vary your swirled design. You can use multiple sauces to create more visual contrast.
5. Garnishing Techniques
In the past, chefs casually threw a piece of kale and an orange slice onto every plate. However, these garnishes added nothing exciting to the dish, and few guests ate them. Modern garnishes pair thoughtfully with the meal to create flavor bites. Follow these garnishing techniques and guidelines to master the last step of food presentation.
- Edible Garnishes - As you finish plating, remember that garnishes should always be edible and enhance the dish. To determine whether a garnish belongs, ask yourself whether you would want it consumed in the same bite as the meal it accompanies.
- Intentional Placement - Never heap garnishes in one corner of the plate. Instead, disperse them thoughtfully to add color or texture. For example, place crispy carrot shoestrings atop a delicate filet of fish nested in a curry sauce and decorate the plate with pomegranate seeds.
- Less Is More - Never clutter your plate for the sake of a garnish. If your plate is full, opt for a drizzle of flavor-infused vinegar or oil to enhance the taste and appearance of your dish without overcrowding your plate.
- Garnishes to Avoid - Avoid using unappetizing garnishes like raw herbs, large chunks of citrus, and anything with a strong odor. Also, avoid garnishes that take a long time to apply.

Comments
Post a Comment